Spontaneous Glass Breakage: Danger and Protection

I’m sure you have heard of the saying, “People in glass houses shouldn’t throw stones.”  I found out in a very frightening way that we have other things to be concerned about in this glass filled world that we live in.

I have had, in every home in which I have lived, glass shower doors of one type or another. They are beautiful, functional and have created visual impact in many bathrooms. In my 47 years of home ownership and 16 years as a design professional, I have peacefully coexisted with them without incident.  That all changed last weekend while my 40 year old son was staying with us overnight. He was taking a shower when suddenly I heard what I thought to be an explosion happen in the bathroom. The glass shower door had literally exploded while he was stepping out of the enclosure, showering him with thousands of pellets of glass!  A call to 911, a trip to the hospital and 24 stitches later he was back home and recovering. Luckily he was not badly hurt because the tempered safety glass did exactly what it is designed to do. The incident however put me on a path to research what could cause this.

According to The Construction Specifier (https://www.constructionspecifier.com/spontaneous-glass-breakage-why-it-happens-and-what-to-do-about-it/ ), many things can cause this less than rare phenomena, including poor edge quality, frame related breakage and thermal stress. This can also occur because of microscopic nickel-sulfide inclusions in the tempered glass.  On commercial sites, building codes generally require some form of safety measures to be put into effect before the structure can be occupied.

One of the safety measures available to home owners is the application of a specialized window film that can be installed on any existing shower doors. A call to my rep at Energy Solutions Window Tinting gave me all of the information I needed about a 3M product which can be applied on site in a day.  This will not stop the breakage but instead will hold the glass pellets together and prevent them from showering down on an unsuspecting bather like my son! The approximate average cost comes to around $10 per square foot. Once my new doors are in place I will be setting up an appointment to have this done throughout my home and I will give an update.

If you would like any other information about this or any other design areas please contact me at liz@chrysalizdesign.com or call the office at 732 270-4546.

Liz Balogh   Chrysaliz Design,LLC

Four Pleat Styles for Window Panel Treatments

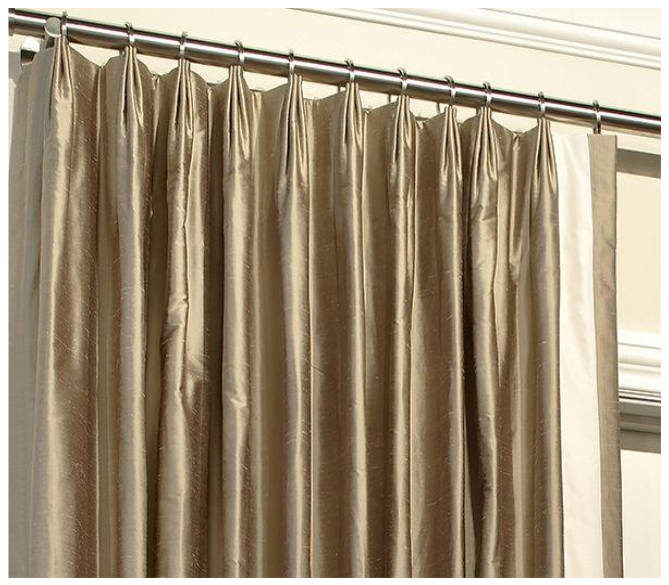
Every window needs to be dressed in some way and when the answer is a beautiful pair of simple side panels the effect can be anything but simple if you keep some key elements in mind.  I’d like to share four pleat styles that I have used in my design plans.

The fabric can dictate best which to choose and your design professional can help to guide you based on that and the look you want to achieve but I would like you to see some options that can make your windows stand out.

french pleat

The French or Triple Pleat is the classic, formal drapery style most of us recognize. This style works well in traditionally styled homes.  When used properly this pleat style give a lush fullness to your window treatments. Fabric choice is key because it can be unwieldy with some thicker fabrics and requires the most fabric when there is an expanse to be covered. They also require a larger stack back (side space on the ends of the window for the fabric when drapery is opened).

single pleat

The Single Pleat is a more modern take on the French Pleat.  It uses less fabric but also is a great choice if you have a fabric with a pattern which you would like to showcase.  This can work better with thicker fabrics as it cuts down on the bulk as well as the stack back.

box pleat


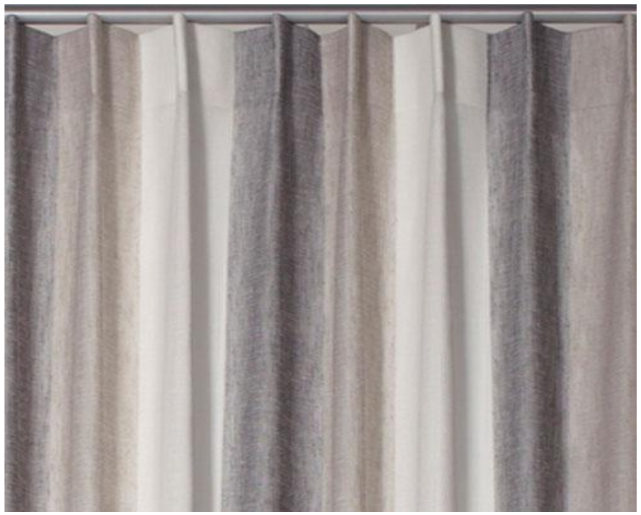
The Inverted or Box Pleat gives a clean contemporary look.  This style works well with patterned fabrics like stripes.  There is not much fullness in this pleat style so it uses less fabric.  However because the pleat is in the back it will not stack back as well as the single pleat.

crown pleat


The Euro or Crown Pleat is tacked at the top of the pleat.  This can give a transitional look and allow your fabric to expand more below the pleat.  Stack back and fabric requirements on this style pleat is very similar to the French/Triple Pleat.

If you would like any other information about this or any other design areas please contact me at liz@chrysalizdesign.com or call the office at 732 270-4546.

Liz Balogh   Chrysaliz Design,LLC

Decorating with Coastal Style

No matter where you may live, the thought of beach living can conjure up feelings of sun, summer and vacation.  Many people like to capture that feeling in their homes through using Coastal Style Décor. Keeping a few tips in mind can help you to successfully incorporate that look into your home.

The first thing to consider is which “coast” would you like to emulate.  There is tropical or island style bringing to mind either more muted feel of British Colonial (think Bermuda) or bright and colorful patterns of some of the other islands. Mediterranean Coastal can be the Aegean blues of Greece or the coastal towns of Spain or Italy with their dark woods and rich terracotta, Even within the American Coastal design the feeling can vary from the east to west coast and with distinct differences as you travel north to south along each (think Kennebunkport versus South Beach).

Screen Shot 2018-08-07 at 10.08.13 PM.png

The unifying factor of all of these locations is their proximity to the sea.  Choosing the proper natural elements, furnishings and colors will allow your style to emerge. Natural light, soft comfortable fabrics and furnishings, the use of reflective surfaces and nautical accessories can help you to achieve the look. For Southern Coastal, lightly distressed painted items in wood and metal will give that well used look. For West Coast, low furniture pieces and expansive views of the ocean give the desired effect. For many people the feeling of a beach cottage with more eclectic furnishings brings back those memories and relaxes after a hard day.

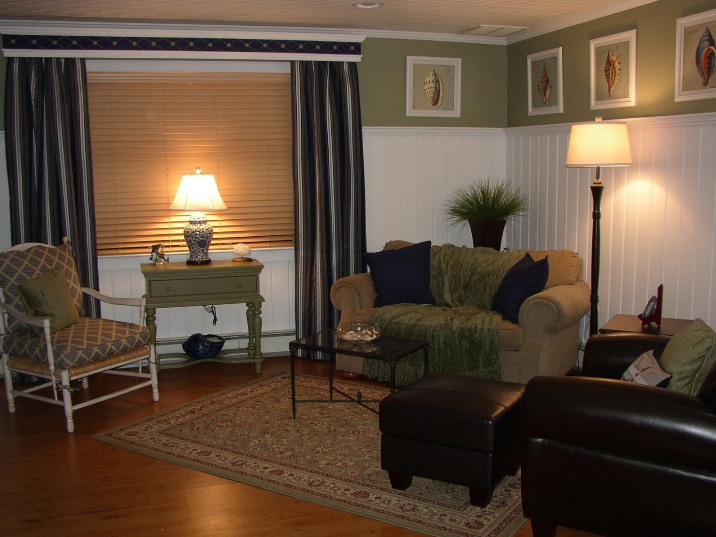
This is an example of Coastal Style that reflects the cottage feel. My clients liked the wall color they had chosen but the knotty pine made the room feel dark and was too distracting in the space. Painting it white brought light into the space and allowed the small sofa to stand out. The white washed cushion chair looks like it could have come from grandma’s house and painted furniture brings the wall color down. Navy blue was the perfect color to accent and the sea shell botanical prints are the perfect size and shape to fit above the bead board paneling.  This small seating area is now functional and inviting as well as reminiscent of a day at the beach.

If you would like any other information about this or any other design areas please contact me at liz@chrysalizdesign.com or call the office at 732 270-4546.

Liz Balogh   Chrysaliz Design,LLC
Screen Shot 2018-08-07 at 10.08.26 PM.png

Marble or Granite Countertops? What’s the Right Choice for Your Project

Anyone who has ever seen the ancient ruins in Greece can tell you that marble is classic and made to last. In today’s busy homes we love to bring beautiful elements of nature indoors and out to add to the functionality and visual impact of our living spaces.  Choosing natural stone in marble or granite for countertops is one way we use them and the investment can be substantial. Knowing the properties of each can make that decision more comfortable.

Marble is a metamorphic rock, formed out of limestone.  Granite is an igneous rock composed of quartz, feldspar, mica and other types of materials.  While both stones are porous and must be sealed to enhance durability, granite is harder at 7 on the Mohs scale versus marble, a 4 on the Mohs scale. Because of this, marble will scratch more easily.  Both are heat resistant and come in a range of colors based on where they are quarried. Marble tends to be more subtly patterned due to its white base and more consistently colored veining while granite can be many hues and have sparkle based on which elements are present.

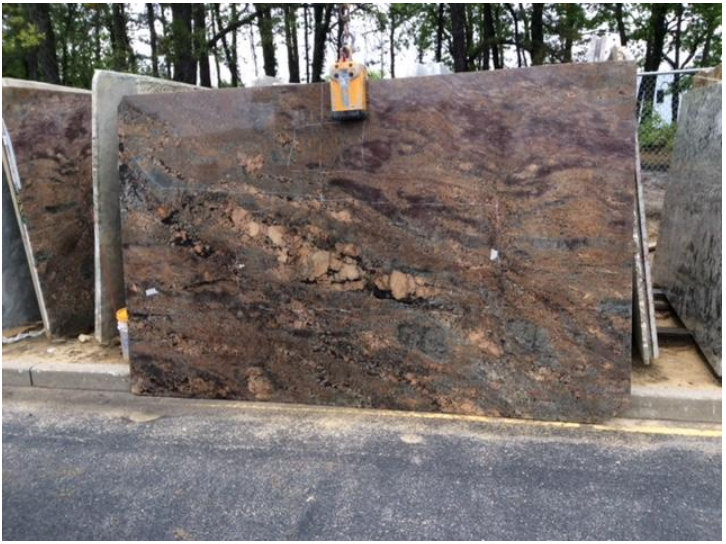
Juan Hernandez, owner of H&S Stone in Toms River, NJ helped me to lay out this granite slab to take advantage of patterning for a large kitchen project for my client.  Note the grease pencil lines. The chunky area near the center is being u…

Juan Hernandez, owner of H&S Stone in Toms River, NJ helped me to lay out this granite slab to take advantage of patterning for a large kitchen project for my client.  Note the grease pencil lines. The chunky area near the center is being used to give an island more impact. The colors and textures of this beautiful stone truly make it one of Mother Nature’s masterpieces!

Sealing stone can add some protection but marble is susceptible to pitting from both acidic and base substances.  Staining is also common with marble so spills must be wiped up quickly to avoid damage. Both stones can chip so care must be paid to things that are dropped on it. Marble will not look the same 10 years after installation. Etching and scratching will create a patina that some people find very beautiful.  If you do not, it can be resurfaced but it is messy and expensive to do this. Also even if you have only 1 area that is affected, it is advisable to do the entire countertop because it is very difficult to duplicate the polished effect. Both granite and marble can be damaged by using the wrong cleaning materials.  It is important to choose cleansers specially formulated for granite and marble. Ask your professional supplier or designer to recommend one if you are unsure. Granite and marble generally fall within similar price point ranges at $40-$175/sq ft installed. In choosing a counter top it is very important to view the entire slab that you are considering.  There can be wide distribution of pattern and color in all natural stone. Your design professional and your stone supplier can help to determine the best layout to bring maximum impact to your project.

If you would like any other information about this or any other design areas please contact me at liz@chrysalizdesign.com or call the office at 732 270-4546.

Liz Balogh   Chrysaliz Design,LLC

How to Mix Patterns for Interesting Interiors

Patterns

Designer Mario Buatta was known for decades as The Prince of Chintz and expertly combined numerous patterns in his rooms with very successful results.  Many people are very hesitant to take such bold steps unaided and resort to rooms filled with solid colors.  Many furniture stores and fabric suppliers have addressed this through offering coordinates that are pre-mixed for you making it easy to buy a packaged look.  Some people just like to look at the catalog from major stores with professionally designed rooms and just order from the page. If you are looking for a more personalized expression of you in your space, there is both a knack and a system for effectively layering patterns for a more unique look.

For the beginner it’s best to start with 3 patterns.  The scale (size of the patterns) should be varied at large, medium and small.  Your largest pattern will set the tone and be the inspiration for your mix. It can be a floral, Ikat, paisley or wide stripe. Your other patterns should always work with the colors within that large print.  Be aware that the fabrics should have a similar design style. For example you would not want to pair a contemporary print with a country calico because the design styles are not compatible. Your 2 remaining prints can be floral, organic or geometric as long as you remember to unify them with color.  Always consider the background color when mixing (for example white vs off white) and keep color intensities uniform. Textures and solids can be added to create more interest and be sure to consider other large non-fabric patterns in your room. For example, an Oriental Style area rug makes a big statement and can be a large item in your space.

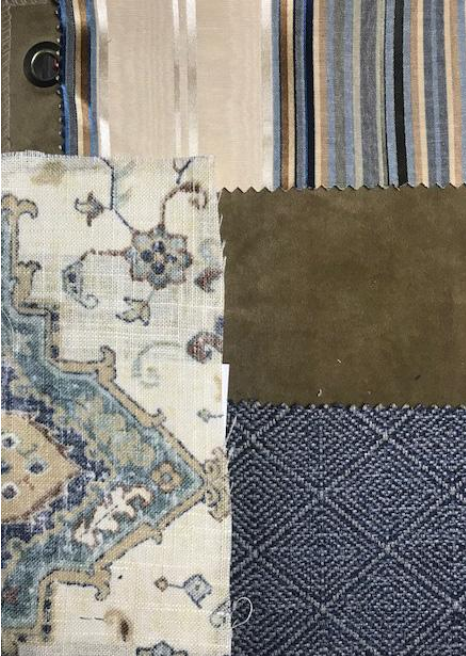
Once you have chosen your patterns it is important to walk the pattern around the room to create balance in your space.   The example of mixed patterns below was created for a Living Room. The sofa was covered in the rich brown suede with 2 chairs in the small scale navy geometric print. Large pillows took advantage of the multicolored linen print and drapes in the vertical stripe added height to the room.  

If you would like any other information about this or any other design areas please contact me at liz@chrysalizdesign.com or call the office at 732 270-4546.

Liz Balogh   Chrysaliz Design,LLC
How to Effectively Use Lighting

Designers work to create beautiful, functional spaces using all of the elements of design effectively. However, without light no one will ever see or appreciate the beauty of even the most perfectly designed space. Just try this. Walk into your favorite room at night.  Now turn out all the lights. What do you think now?

The first thing to consider when creating a lighting plan for your space is the different levels or layers of lighting you need.  Each room requires ambient lighting, task lighting and accent lighting, each with a very specific function.

Ambient lighting provides overall illumination or general lighting to your space.  Think of the old fashioned light bulb hanging in the center of a room for a bare bones image of ambient lighting.  Today’s lighting choices for this purpose can include anything from a grand chandelier to a wide array of recessed lighting fixtures.

Task lighting is built around the functionality of your space and should be chosen accordingly.  How will you be using your space? Will you be reading, watching TV, socializing, eating…? These needs can be met by very specific fixtures. Think about a Pharmacy Style Floor Lamp placed next to your favorite reading chair or a lovely Porcelain Ginger Jar Style Table Lamp placed on the end table next to your sofa for social situations.

Accent lighting is used to bring attention to focal points that you would like to showcase in your space.  Do you have a fabulous piece of art or a beautiful stone wall for your fireplace? There are fixtures that can meet these needs as well as a plethora of others. Accent lighting can be used as up lighting such as behind a plant in a corner or can be installed within furniture pieces like behind a glass door or in a display nook.

The first step is to create a floor plan for your space so that you can develop an effective lighting plan to complement your design.  Then consider types of fixtures needed and the color temperature and types of bulbs you will be using. There are many developments in this field with LED bulbs readily available that will cover the color spectrum.  Be aware that if your fixtures are attached to a dimmer switch, bulbs must be compatible and say “dimmable” or you will get flickering. While many spaces use lighting to create a sparkle always be aware of glare that can be produced with the use of some types of bulbs with exposed filaments (think the retro looking “Edison Style Bulbs”).  Above all, always follow recommended wattage restrictions and use a qualified professional for any electrical wiring or installations you require.

If you would like any other information about this or any other design areas please contact me at liz@chrysalizdesign.com or call the office at 732 270-4546.

Liz Balogh   Chrysaliz Design,LLC

What’s All the Hype About Shiplap!

With the popularity of HGTV shows like Fixer Upper and Joanna Gaines design style more people are asking about shiplap, this southern style staple and how to use it as a design element.  Knowing what it is and isn’t can help you to decide if it is the right choice for your project.

First it is important to know that true shiplap is very specifically routed boards applied horizontally.  As pictured below, it’s the notches (called rabbets) which interlock to create a flush surface which becomes watertight when used for its original purposes on ships and as an exterior surface material.  

Screen Shot 2018-08-28 at 1.41.31 PM.png

You can purchase shiplap in a variety of wood species and finish in a natural rustic style or paint it any color that you can imagination.  The cost varies from approximately $2.50/sq ft-$7.00/sq ft based on quality, the type of wood chosen and where you live. For example locally sourced wood species may be less costly than more exotic ones.  If you are considering this as a DIY project, you should carefully consider your skill level before attempting and if you are not proficient paying a professional may be a wise investment as mistakes can be quite costly.  According to HomeAdvisor.com the national average costs for hiring professional installation of a 200/sq ft room is between $1000-$1700. Please consider your geographic location and current market when pricing out your job.  There are also additional materials required such as underlayment, nails, spackle, wood filler and finishing which need to be factored into your costs for the project.

If you would like any other information about this or any other design areas please contact me at liz@chrysalizdesign.com or call the office at 732 270-4546.

Liz Balogh   Chrysaliz Design,LLC
LVT –What is it and is it right for me?

Vinyl was invented by accident in Akron, Ohio in 1926 when a researcher decided to experiment with the materials from his failures and created a plasticized vinyl chloride.  It’s use as a flooring in some incarnation began in the 1930’s, really taking off in the 1960’s and is now the most widely used flooring material in both the residential and commercial market today.   

LVT or Luxury Vinyl Tile has been one of the fastest growing categories within the industry.  Our new technology can create natural wood look flooring in plank styles that can visually mimic the most prized of hardwoods without hurting the Rain Forest or ceramic and stone looks that will allow for more warmth underfoot and fewer broken glasses when dropped.

When cost is a consideration, average hardwood floors run between $8-$25/sq. ft. and most LVT’s run between $2-$8/sq. ft so your budget dollars can go further with LVT.  Design options can be limitless because LVT is easily cut and inlays and patterns can be incorporated.

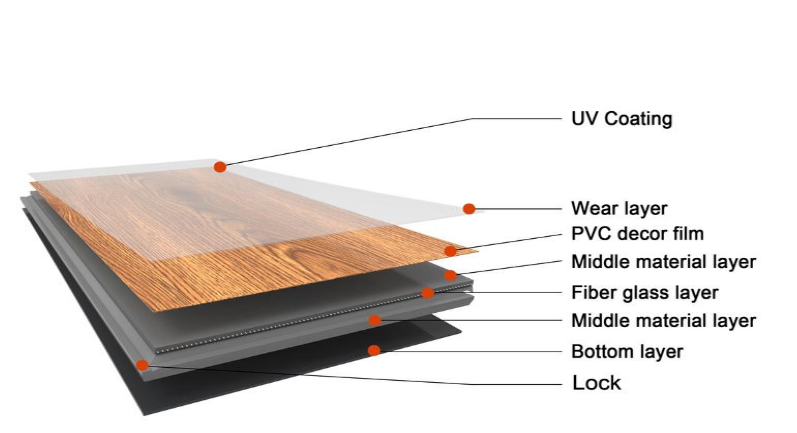
Add to this the variety, beauty, water resistance and durability this product can offer and you can understand why it has become so popular. However, with many companies offering LVT, performance as well as style should be a consideration when choosing to specify LVT.  Understanding the construction and installation factors can help you to determine the right LVT for your project.

Construction

Construction

One key to durability is the wear layer thickness.  Measured in mils, this provides better protection from stains, wear and scratches.  This should always be discussed with your supplier when considering this product.

The installation method will also be a major consideration for your project. This product can be glued down or installed as a loose lay. Your design professional and installer can discuss which option best suits your location and needs.

If you would like any other information about this or any other design areas please contact me at liz@chrysalizdesign.com or call the office at 732 270-4546.

Liz Balogh   Chrysaliz Design,LLC
Accent Walls-Why, Where and How

Accent walls, sometimes called feature walls, are a great way to update a room and even give a lift to an existing space. With a few key considerations you can create the right look to maximize visual interest and personalize your home.

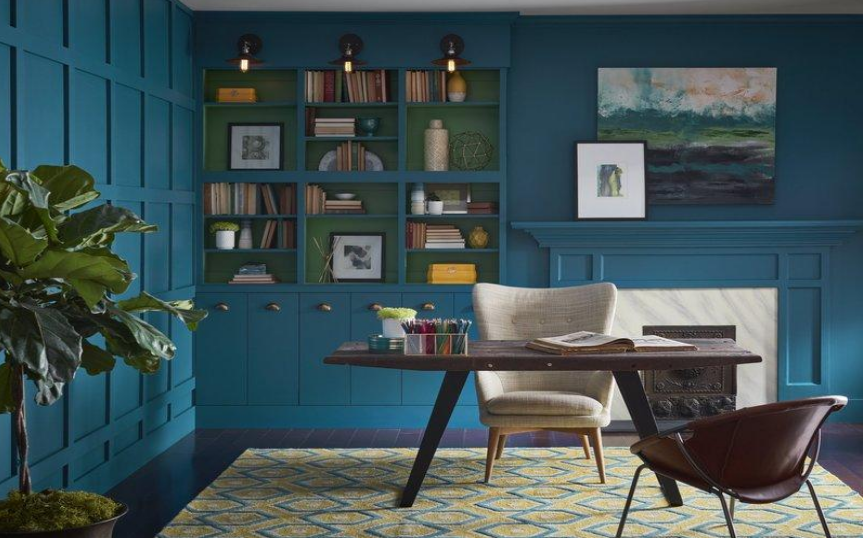
As the name implies, an accent wall will draw your attention in any space.  With this in mind you need to carefully assess your room and decide where you would like to direct focus.  This could be a main wall that you view immediately upon entering or even a wall that links 2 spaces. Accent walls can add depth or brightness to a room based on the color and finish you choose. Scale and proportion should also come into the equation when choosing which wall to accent.  

Once you have determined the location of your accent wall, you need to look at your space and furnishings.  What will be in front of this wall? Will you be hanging artwork on it? These items will need to work with the color and texture you choose for the accent wall. Look at the current palette in your room to decide which color you would like to pop.  Most often this color should not be a major color that you are already using in your larger furnishings. Otherwise instead of popping, your accent wall will blend with the room.

The easiest and least expensive way to create an accent wall is with paint.  The availability of colors and finishes are limitless, the cost of the product is relatively low and with proper preparation, tools and clean up, an average sized wall is not a large undertaking for a DIY project.  Many suppliers also have specialized products to create custom finishes and can advise you on how to use them to create more interesting effects. Check out Sherwin Williams for products, ideas and experts who can help you to use them (www.sherwin-williams.com).

Wallpapers can also be a great tool for creating an accent wall.  The skill level required is substantially higher, products can be more expensive and removal can be labor intensive if you change your mind.  There are now some really beautiful removable wall papers which can work but be aware of pattern matching challenges and be sure you factor that overage in when purchasing.

IMG_0129.jpg

Tile and wood can also be used on accent walls. These options again add to the cost and permanence of your decisions.  You may also want to hire a professional for this type of wall because mistakes can be costly and damaging to existing walls.

If you would like any other information about this or any other design areas please contact me at liz@chrysalizdesign.com or call the office at 732 270-4546.

Liz Balogh   Chrysaliz Design,LLC